Making photopolymer plates (PPP) for unique impressions on metal clay is fun and easy.
1) First, order the plates and accessories as a kit from one of the many suppliers, such as PMC123 (almost local for me, so fast!), Whole Lotta Whimsy or Cool Tools. There are different types available. I started with the polyester-backed PPP kit from PMC123 and that's what I'm showing here. Other kits may differ. I just tried the steel-backed PPP for the first time. The advantage of steel backing is that it keeps the plate from warping. The disadvantage of steel backing is that you can't see through it to check positioning and completeness of imprint. Store PPPs in their dark, light-proof wrapping until ready to expose.
2) Print your own or copyright-free black-and-white artwork onto transparency film. Make sure, if you use your home printer, to get the right film or the ink will refuse to dry. I make two copies of each image and stack them to get a darker impression. Whole Lotta Whimsy sells an extra-step, thermal film to make transparencies for better imprints, but I've not used it. Remember that where the transparency is dark, the photopolymer will be unexposed and removed from the plate, so that the imprinted clay will be raised there.
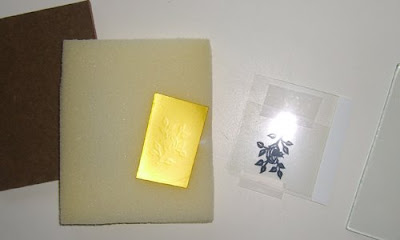
3) Carefully unwrap the PPP material, cut to desired size (easier with polyester than with steel). Rewrap unused portion immediately. Remove plastic cover from emulsion. Quickly layer in order: backplate, foam, PPP (emulsion side up), transparency (ink side down), and glass. Clamp stack together. Note: Think of looking through the PPP from the backing side; this will be "up" when you print onto clay. Make sure any text will read correctly.
4) Expose to UV source. This can be a UV lamp or, in my case of Central Texas, the blinding overhead sun. I only need 1.5-2 minutes of exposure outside for good prints.
5) Rinse with cool water and a fine brush to remove material that was unexposed under the dark image. Don't scrub too hard; don't scrub too long. I judge by when the foaming stops. It should only take a minute or two.
6) Post expose to completely harden the film. I just leave mine out in the sun while I continue with the next plate. The rule of thumb is twice as long as the original exposure. I find that sometimes the plate will be sticky if I washed too long and don't get it good and set at this point, so I err on the side of more exposure.
7) Oil plate before every use with a brush and olive oil or other release agent. Brush with oil and store on edge to minimize the inevitable warping.
Enjoy your original textures!
Friday, February 06, 2009
Photopolymer Plates for Metal Clay
Labels:
metal clay


